
Bridge Progression For Strong Lower Back And Impressive Flexibility!
If you’re looking to strengthen your lower back muscles and unlock impressive flexibility, then bridge progression is for you!
Picture this: a powerful exercise that not only targets your lower back but also works wonders for your overall spine flexibility. It’s like hitting two birds with one stone! The Bridge Progression is all about harnessing the strength and flexibility of your body to achieve remarkable results.
So, are you ready to take your lower back strength and flexibility to new heights? We are about to dive deeper into the various stages of the Bridge Progression, offering tips and guidance along the way. Let’s make those bridges and build a foundation of strength and flexibility that will last a lifetime!
Level Of Difficulty
Bridge progression is the best suited for:
- Beginner*
- Intermediate
*This progression is well-suited for people who are just starting out. It starts with easy exercises for beginners and moves on to the more challenging ones that are better suited for intermediate athletes. Note that all physical activity comes with a risk of injury. Before starting any type of physical activity consult your doctor.
Bridge Progression: Muscles Worked
One of the greatest benefits of this progression is building the strength of your lower back muscles.
Bridge progression muscles worked:
Primary:
- Erector spinae
- Glutes
- Hamstrings
- Hip abductors
Secondary (stabilizers):
- Rectus abdominis
- Obliques
- Quads
Bridge Progression: Equipment
You can start your bridge quest without the need for any equipment. As you progress, you may find it useful to have some equipment like a box, or bench.
Equipment:
- Exercise mat (optional)
- Box
Bridge Progression: Exercises
Bridge progression starts with swimmers exercise which is pretty easy to do. So it’s excellent for beginners.
It will gradually move you through more and more difficult exercises ending with a bridge hold. When bridge hold is easy for you it’s time to try harder moves. There are a lot of harder exercises you can try in a back lever progression.
Bridge Levels
There are three levels that will bring you to your first bridge. It will start with the easiest beginner-friendly skills and progress to harder and harder near the end. If you take your time and do it step by step, you will soon be able to pull off the bridge.
On Level 1 you will work on basic lower back strength.
With lower back strength you will also work on back shoulder extension on Level 2.
The bridge is the skill you will be working on at Level 3.
Here’s what you will be working on:
Level 1
- Swimmers
- Lower body lifts
- Upper body lifts
- Arch hold
- Superman lifts
Level 2
- Tabletop hold
- Tabletop lifts
- Reverse elbow plank
- Reverse plank
- Reverse plank raises
Level 3
- Elevated laying bridge
- Elevated bridge
- Head bridge
- Bridge
Level 1
Level 1 is used to develop basic lower back strength. The aim is to work yourself up to superman lifts. This skill will round up the basic preparation phase of bridge progression.
Swimmers
Swimmers exercise should be easy enough for any level of fitness ability. In most cases, if you are healthy, you should be able to do this exercise.
If you can do 3 sets with 5 reps in each set, you can start working on this progression. If this is too hard for you, you should do rehab. Consult with your doctor.
Equipment:
- Exercise mat (optional)
How to perform swimmers
Positioning:
Lay on the floor on your belly. Your arms should be above your head and your legs straight.
Performing:
Lift your right leg and your left arm off the floor. Your left leg and your right arm should remain on the ground.
Lower down your right leg and your left arm back to the ground.
Now, lift your left leg and your right arm and repeat. When you do this move on both sides, you have done one rep.
When you are able to do 15 reps in 3 sets you have reached mastery for swimmers.
Prerequisite for next exercise:
- 3×10 swimmers
Lower Body Lifts
Lower body lifts will be harder than swimmers because you have to lift both your legs off the ground. You will feel your glutes and your lower back muscles working.
If you are also doing glute bridges from pistol squat progression, don’t do those two exercises one after the other. They are both working your lower back and glutes. So, doing them one after the other might feel too hard.
Equipment:
- Exercise mat (optional)
How to perform lower body lifts
Positioning:
Lay down on your belly with your legs straight and your arms above your head with palms down on the floor.
Upward movement:
Lift your legs up slowly off the floor. Keep your arms and your upper body on the floor.
Downward movement:
Slowly lower your legs back to the ground.
The mastery level for this exercise is 3 sets with 15 reps in each set.
Prerequisite for next exercise:
- 3×10 lower body lifts
Upper Body Lifts
Upper body lifts will work your lower back muscles. You will not feel your glutes like in lower body lifts.
Since your upper body is longer and heavier than your legs, this exercise might be harder than lower body lifts. It’s not a rule though. If your glutes are weak, lower body lifts might be harder for you.
Equipment:
- Exercise mat (optional)
How to perform upper body lifts
Positioning:
Position yourself on the ground with your arms above your head and your legs straight.
Upward movement:
Slowly lift your upper body and your arms off the floor. Your legs should remain on the ground.
Downward movement:
To return to starting position, slowly lower your arms and your upper body to the ground.
To reach mastery, do 3 sets with 15 reps in a set.
Prerequisite for next exercise:
- 3×10 upper body lifts
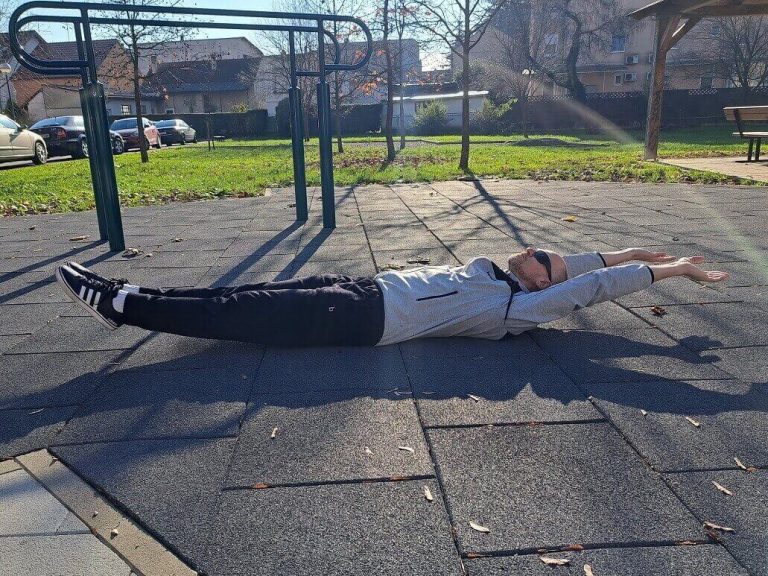
Arch Hold
The arch hold will have you lift both your upper and lower body off the ground. This will be harder to do than lifting only the lower or upper body. This is an isometric exercise. You will be holding one position for a time without moving.
Equipment:
- Exercise mat (optional)
How to perform arch hold
Positioning:
Lay down on your belly with your legs straight and your arms above your head.
Performing:
Lift both your upper body and your lower body off the ground at the same time. Only your belly will stay on the ground.
Keep holding this position as long as you can.
If you can do 3 sets with 60 second hold in a set you have reached mastery.
Prerequisite for next exercise:
- 3x30s arch holds
Superman Lifts
You can look at superman lifts as an active version of arch hold. In arch holds you are lifting your upper and lower body off the ground and just holding this position. In superman lifts, you are doing the same for reps.
Equipment:
- Exercise mat (optional)
How to perform superman lifts
Positioning:
Lay on the ground with your face down, your legs straight and your arms above your head.
Upward movement:
Rise your upper and lower body off the ground. Keep your belly on the floor.
Downward movement:
Slowly lower down your upper and lower body at the same time. Keep on raising and lowering your upper and lower body for reps.
To reach mastery do 15 reps in 3 sets.
Prerequisite for next exercise:
- 3×10 superman lifts
Level 2
On this level, you will slowly build your strength for the bridge that follows on the next level. You will no longer be laying on your belly. This will help you work your abs and obliques as well as your lower back and your glutes. It will also improve your shoulder flexibility.
Tabletop Hold
The tabletop hold is another isometric exercise. It will work your lower back, glutes, and abs. You will also feel the tension in the back part of your shoulders.
You may find your shoulder flexibility is the limiting factor for this skill. Work on your shoulder mobility slowly and you will be able to do this exercise.
Equipment:
- Exercise mat (optional)
How to perform tabletop hold
Positioning:
Sit on the floor with your arms behind your butt. Your palms should be facing forward. Lift your butt off the ground until your body from your knees up to your shoulders form a straight line.
Performing:
You are now in a tabletop hold position. Hold this position as long as possible.
For mastery do 3 sets with 60 second hold per set.
Prerequisite for next exercise:
- 3x30s tabletop holds
Tabletop Lifts
Tabletop lifts are a dynamic version of the previous move. Instead of just holding a static position, you will be doing reps.
Equipment:
- Exercise mat (optional)
How to perform tabletop lifts
Positioning:
Sit down on the floor with your hands behind your back and your knees bent. Your palms should be on the ground facing forward.
Upward movement:
Lift your butt off the ground slowly. Keep on lifting until your body from your shoulders to your knees is in a straight line.
Downward movement:
Let your butt slowly lower down. Keep on lowering until you reach the starting position.
Repeat for reps.
To reach mastery perform 15 reps in 3 sets.
Prerequisite for next exercise:
- 3×10 tabletop lifts
Reverse Elbow Plank
The reverse elbow plank is a bit harder than the tabletop hold. Again, it’s another isometric hold skill.
Equipment:
- Exercise mat (optional)
How to perform reverse elbow plank
Positioning:
Sit on the ground with your legs straight. Your forearms should be positioned on the floor to support your weight.
Performing:
Raise your butt off the ground. Keep on raising until your body from your feet to your shoulders is in a straight line.
Keep this position as long as you can.
When you can do 3 sets with 45 second hold in each set you have reached mastery.
Prerequisite for next exercise:
- 3x30s reverse elbow planks
Reverse Plank
In reverse plank, you will have your arms straight. This will make it a little bit harder on your arms than reverse elbow planks.
Equipment:
- Exercise mat (optional)
How to perform a reverse plank
Positioning:
Sit on the ground with your legs straight and your arms behind your butt. Your palms should be facing forward.
Performing:
Raise your lower body off the floor until your body from your feet to your shoulders is in a straight line.
Hold for time.
If you can hold this position for 45 seconds in 3 sets you mastered this skill.
Prerequisite for next exercise:
- 3x30s reverse planks
Reverse plank raises
Reverse plank raises are a dynamic version of reverse planks. So, you will do this move for reps.
Equipment:
- Exercise mat (optional)
How to perform reverse plank raises
Positioning:
Sit down on the floor with your hands behind your back and your palms facing forward. Your legs should be straight.
Upward movement:
Lift your butt off the ground slowly. Keep on lifting until your body is in a straight line from your feet to your shoulders.
Downward movement:
Let your butt slowly lower down. Keep on lowering until you reach the starting position.
Repeat for reps.
To reach mastery perform 15 reps in 3 sets.
Prerequisite for next exercise:
- 3×10 reverse plank raises
Level 3
If you ever wanted to learn how to do bridges, here’s the time to learn this skill. This level will make you move from a bridge novice to a bridge expert.
As in most progressions, the bridge is another skill you can brag about. When you master this level you will certainly earn bragging rights.
Bridges are not suited well for people with problems with the middle ear. It’s also not suited well if you suffer from vertigoes. As always, ask your doctor if you should do this.
Elevated Lying Bridge
The easiest bridge variant is an elevated lying bridge. You will be lying on an elevated surface and bend your back. This will help you position your palms on the ground.
Equipment:
- Box (or some elevated surface you can lay on)
How to perform elevated lying bridge
Positioning:
Lay on the box on your back. Your butt and your legs should remain on the box when you do this exercise.
Performing:
Arch your back and place your palms on the ground behind you.
Hold this position for time.
For mastery hold for 30 seconds in 3 sets.
Prerequisite for next exercise:
- 3x15s elevated lying bridges
Elevated Bridge
An elevated bridge is a harder variant than elevated lying bridge. Your legs will be on an elevated surface. Your hands will be on the ground.
Equipment:
- Box (or some elevated surface you can lay on)
How to perform elevated bridge
Positioning:
Lay on the box on your back with your legs bent.
Performing:
Reach behind you off the box and place your hands on the floor. Raise your butt off the box.
Hold for as long as possible.
If you can hold this position for 30 seconds in 3 sets you reached mastery.
Prerequisite for next exercise:
- 3x15s elevated bridges
Head Bridge
A head bridge is the first bridge version done on the ground. This will be a bit harder than the elevated version.
Equipment:
- Exercise mat (optional)
How to perform head bridge
Positioning:
Lay on your back on the floor with your legs bent.
Performing:
Place your palms on the floor behind your shoulders. Raise your butt off the ground by arching your back. Your head should remain in contact with the ground the whole time.
Hold this position as long as you can.
When you are able to hold for 30 seconds in 3 sets you reached mastery for this exercise.
Prerequisite for next exercise:
- 3x15s head bridges
Bridge
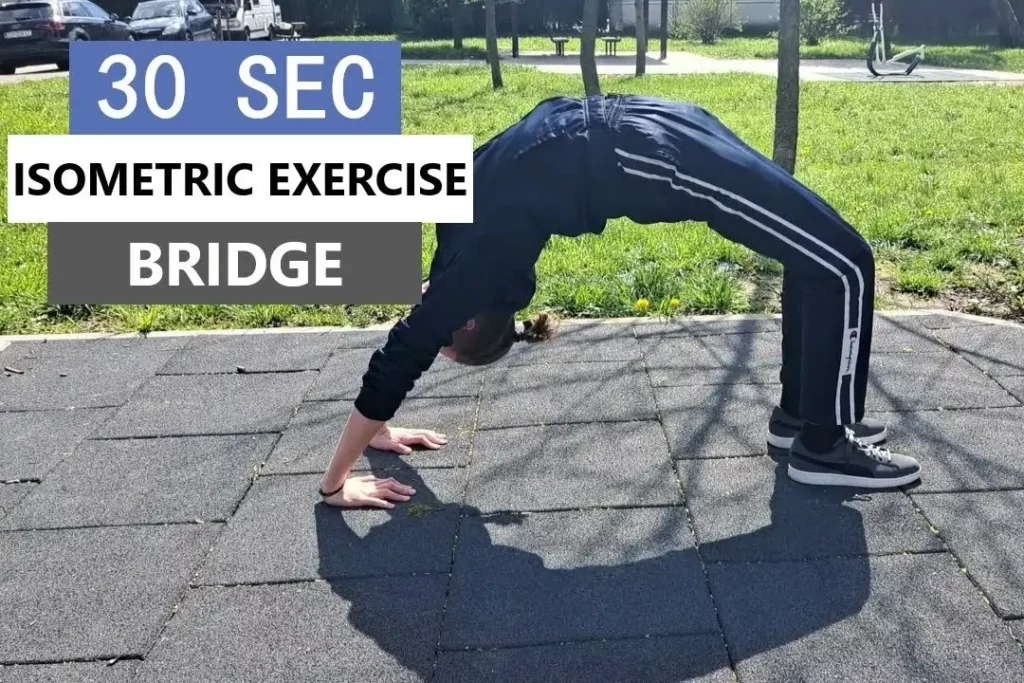
The bridge is the most challenging bridge exercise. It’s another cool skill worth mastering.
Equipment:
- Exercise mat (optional)
How to perform bridge
Positioning:
Lay down on the ground and bend your knees.
Performing:
Reach behind you with your arms and place your palms on the floor behind your shoulders. Lift your butt off the floor and push with your arms. Arch your back and hold for as long as you can.
For mastery, hold for 30 seconds in 3 sets.
Conclusion
We’ve reached the end of our journey through the incredible world of Bridge Progression. I hope you’re as excited as I am about the possibilities that lie ahead.
By incorporating the Bridge Progression into your fitness routine, you’re not only strengthening your lower back muscles but also unlocking a whole new level of flexibility. You’ll be amazed at the progress you’ll make as you challenge yourself and gradually advance through the different stages of this progression.
Remember, consistency is key. Make it a habit to practice the Bridge Progression regularly, and you’ll reap the benefits in no time. Your lower back will become stronger and more resilient, supporting you through your everyday activities and workouts.
For further development check out the back lever progression.