Head Bridge Exercise For Strong And Healthy Spine
The head bridge exercise is a more accessible version than the standard bridge. It’s easier to do because of the reduced load on your arms.
You will have to balance on your feet, head, and bent arms with your back arched. Because weight is distributed between your arms and your head, it’s easier to do than the standard bridge.
Bridges in any variant are skills that will help you uncover your weak points. Don’t shy away from moves that humble you though. They will help you build strength and flexibility. This will help you with other exercises as well as with everyday movement patterns.
People mostly concentrate their effort working on so-called mirror muscles. Those are the chest and biceps muscles. After growing past this first phase, they might introduce their upper back, triceps, and abs. Some might even include the leg workout in their training schedule. In most cases, lower back muscles will get neglected.
This is where head bridges come in handy. The head bridge exercise is part of the back lever progression. This progression will help you build your lower back strength.
Main benefits of head bridge exercise
Head bridges will help you increase strength and flexibility in several areas. Some of the main benefits are:
- Increased core strength: To be able to hold this pose you will have to engage your lower back, your abs, and glutes. This will improve your core strength.
- Improved spine health: Holding a head bridge will build the strength of your spine stabilizer (erector spinae) muscles and improve the flexibility of your spine.
- Hips strength and flexibility: Your hip muscles will also help you hold this position. It will also improve the range of motion of your hips.
- Improved airflow: This skill will open up your chest and help to improve airflow through your lunge.
Equipment
Head bridges can be done without any equipment. Especially if you are on a soft surface. If you are on a hard surface, it will be much more pleasing to do this move using an exercise mat. This is optional but will make it easier and more pleasant to do.
Head bridge exercise equipment:
- Exercise mat (optional)
Head bridge exercise – muscles worked
This skill will work mostly your core muscles. Your lower back, or muscles that help you hold your spine are the main muscles that are targeted with this skill.
Head bridge exercise muscles worked:
Primary
- Spinal erectors
Secondary
- Hamstrings
- Glutes
- Abs
- Traps
- Rhomboids
- Triceps
How to do head bridge exercise
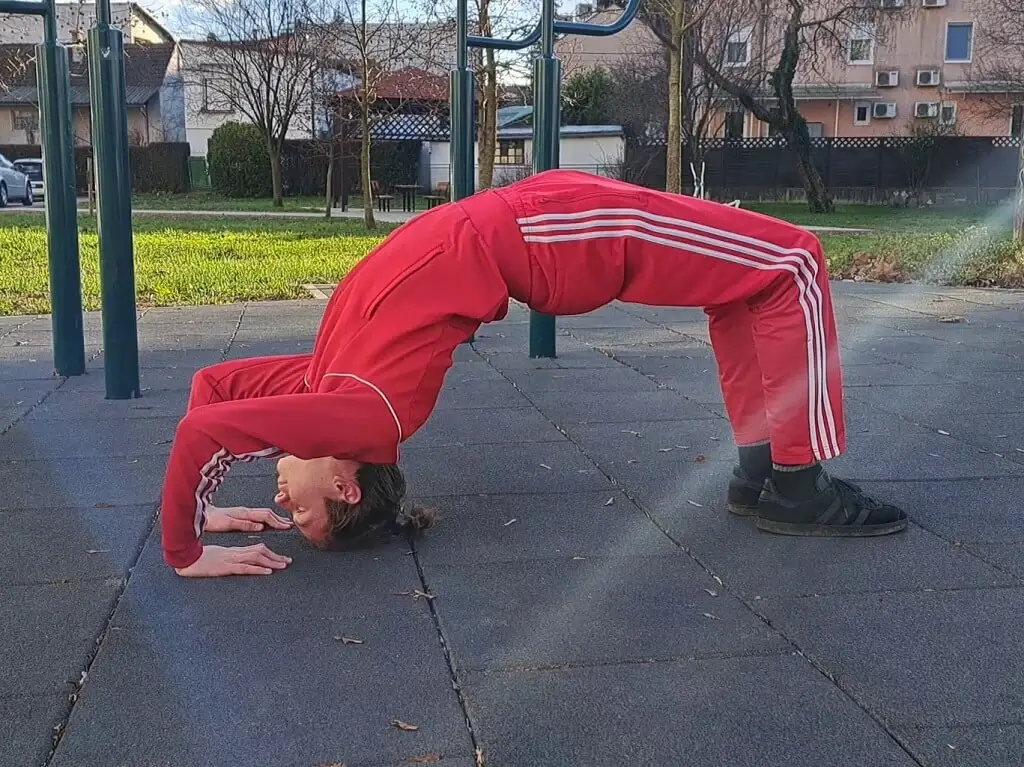
Positioning:
Lay down on your back. Bend your knees and put your feet on the ground at around hip width. Place your palms on the ground behind your shoulders at about shoulder width.
Your fingertips should be placed somewhere between your ears and the top of your head. This will ensure you can raise from the ground once you are strong enough to do a standard bridge.
Performing:
Arch your back by lifting your butt off the ground. Keep your head in contact with the ground.
You will have to keep your head, hands, and feet on the ground. Balance in this position and hold it as long as you can.
Try to keep this position for 30 seconds to reach mastery.
Common mistakes
Mistake 1 – Incorrectly positioning your head
Mistake:
In a head bridge exercise your head should be in contact with the ground at the top of your head (your scalp). Don’t let your head be in the contact with the floor more to the back or to the front. This will insure your neck is in a neutral position. It’s important to protect your neck from injury as much as possible.
Correction:
When raising your butt off the ground keep in mind the ending position. The position in which you will hold will be with the top of the head on the floor. Take special care that you end up in this position to protect your neck. If you don’t feel it, do the exercise in front of the mirror or record yourself and correct the position accordingly.
Mistake 2 – Too much weight on your head
Mistake:
When holding in the head bridge the majority of the weight should be on your feet and your hands. Your head should be placed on the ground lightly. This will ensure the safety of your neck.
Correction:
To ensure you are not loading your head too much concentrate on pushing against the ground with your hands. Try to deload your head as much as possible. Remember the next step is the bridge. So, you will have to push yourself off the ground at this stage of development.
Mistake 3 – Keeping your feet too close
Mistake:
If you keep your feet too close you will have a hard time balancing. It can make this move harder to pull off. In some cases, you may even fall down because your feet were too close.
Correction:
When positioning yourself remember to place your feet on the ground at around hip-width or a bit wider. When your feet are positioned correctly, you will be able to balance more easily.
Progression
The head bridge exercise is positioned somewhere in the middle of the back lever progression. So, there are plenty of skills you can do that are easier than head bridges. There are also a lot that are harder. Here are a few moves you can try if head bridges are too challenging:
When you master head bridge you may be wondering what skills you can try next. There are a few options for you:
Key takeaways
The head bridge exercise is an easier version of a standard bridge. It’s a great skill that will help you build your lower back strength and spine flexibility.
In most cases, your lower back muscles will be neglected. Most people who are working out concentrate most effort on their mirror muscles. This is where head bridges will help. This skill will target your lower back.