Back Lever Progression – From A Complete Beginner To Master
Back lever progression is one of the easiest calisthenics progressions. If you are after cool-looking calisthenics skills, the back lever is one of the easier ones to master.
You probably know how easy it is to progress with weight training. You simply put another plate at the end of the bar in each training session.
But how do you progress with bodyweight training?
It’s easy when you have access to calisthenics progressions. This is what back lever progression will help you do. Read on and learn how to go from a complete beginner to a back lever master.
Level Of Difficulty
Back lever progression is most suitable for:
- Beginner
- Intermediate
- Advanced
This progression starts with laying stick lifts which is an exercise suitable for beginners. Exercises that follow are more suited for intermediate athletes. The last few exercises are more on the advanced side of the spectrum.
Back Lever Progression: Muscles Worked
You will have to build strength in your entire body to be able to pull off the back lever. Working your way through back lever progression will help you slowly build the strength needed for this hard skill.
Back lever progression muscles worked:
Primary:
- Delts
- Lats
- Biceps
- Forearms
- Traps
- Rhomboids
- Teres minor
Secondary:
- Pec major
- Lower back
Back Lever Progression: Equipment
Throughout the different stages of your back lever quest, you will need different equipment.
Equipment:
- Exercise mat (optional)
- Box
- Pull up bar
Back Lever Progression: Exercises
In back lever progression you will go from the easiest skills like laying stick lifts. You will have to pass through some cool moves like skin the cat and German hang. So, in the end, you will be able to do the full back lever.
You can easily find the appropriate starting point that is exactly at your level of capability. Try a few exercises and see at which level you can do 3 sets of 5-8 reps in a set. This is where you should start.
To continue your progress, follow the necessary requirements for each exercise in a progression. Move on to the harder skills one exercise at a time.
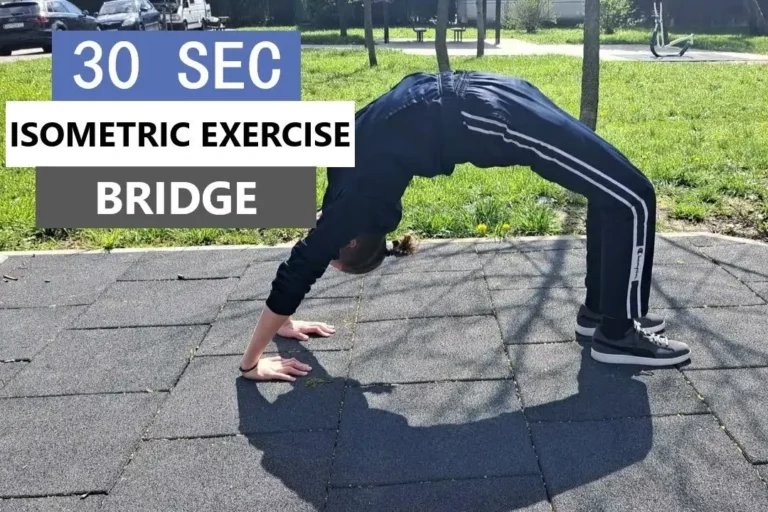
Prerequisites
Although back lever progression can be started without any preparation, you will benefit by going through the bridge progression first. The strength and flexibility you get from bridge progression will help you go through back lever progression faster and safer.
Laying stick lifts
Lying stick lifts will help you improve the flexibility of your shoulders needed for the back lever. It will also help you get the feeling about the placement of your arms behind your back also needed for the back lever.
Equipment:
- Stick (like a broomstick)
- Exercise mat (optional)
How to perform laying stick lifts
Positioning:
Lay on your belly and grab a stick behind your back. Your palms should be facing up.
Upward movement:
Raise your arms up in the air while holding a stick.
Downward movement:
Slowly lower your arms down.
To reach mastery do 15 reps in 3 sets.
Prerequisite for next exercise:
- 3×10 laying stick lifts
Vertical Hold
A vertical hold will be easier to do on rings or dip bars than on a straight bar. You will just be holding your body upside down while holding onto a bar or rings.
Equipment:
or
How to perform vertical hold
Positioning:
Grab a pull up bar or rings with your hands. Rotate your entire body with your knees tucked close to your chest. Keep rotating until you are upside down. Straighten your legs.
You are in a vertical hold position.
Hold as long as you can.
Prerequisite for next exercise:
- 3x10s vertical holds
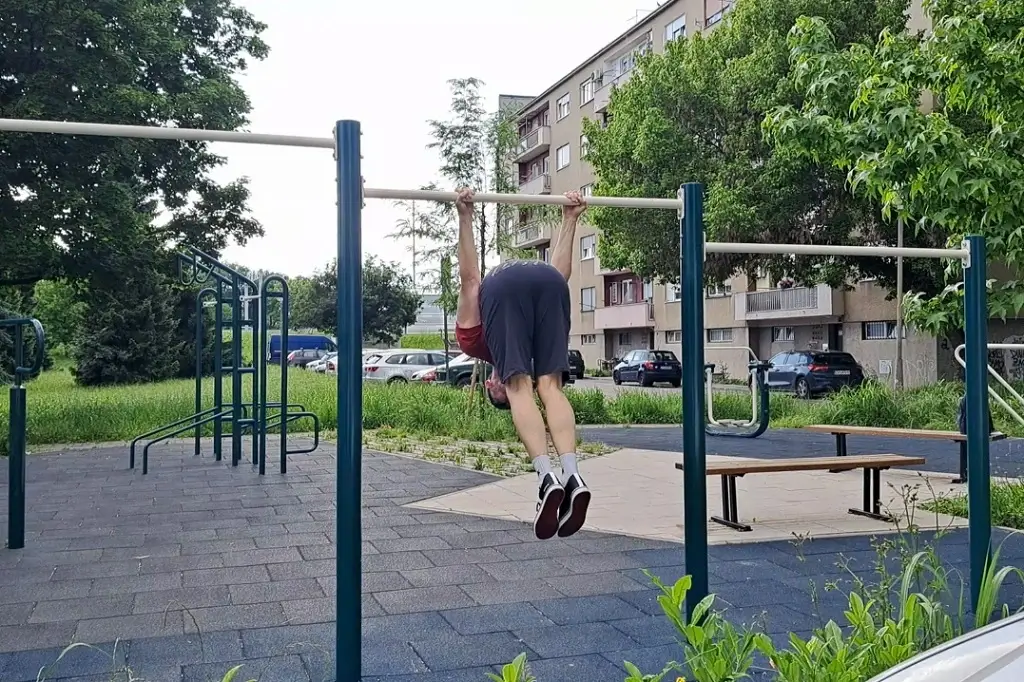
Skin The Cat
Skin the cat will not have you do nasty things to your neighbor’s pet. It’s just one of the prep skills for the back lever.
Equipment:
or
How to perform skin the cat
Positioning:
Grab onto a pull up bar or rings. Hang freely with your feet not touching the ground.
Performing:
Rotate your entire body while holding firmly. Keep rotating and go past vertical. Rotate until your shoulders can hold your weight.
The easier version is rotating with your knees tucked. The harder variation is rotating with your legs straight. The leg straight variant will require excellent flexibility. This version can be done on rings and not on the bars.
Rotate back to reach starting hanging position.
Prerequisite for next exercise:
- 3×5 skin the cat
German Hang
German hang is the lowest position of the skin the cat.
Equipment:
or
How to perform German hang
Positioning:
Do the skin the cat move. Rotate until you pass the vertical positions and your upper body is parallel to the ground. Extend your legs straight down toward the ground.
Performing:
Hold this position steady.
Prerequisite for next exercise:
- 3x10s German hangs
Tuck Back Lever
Tuck back lever is the easiest version of a back lever. It’s performed with your knees tucked toward your chest.
Equipment:
or
How to perform tuck back lever
Positioning:
Do skin the cat. Keep your knees tucked to your chest the whole time. Keep rotating until your body is parallel to the ground. You reached the tuck back lever.
Performing:
Hold this position for time.
Prerequisite for next exercise:
- 3x10s tuck back levers
One Leg Back Lever
One leg back lever is harder than a tuck back lever. This is because your straight leg makes a bigger lever. So, you will have to use more strength to resist the gravity pull.
Equipment:
or
How to perform one leg back lever
Positioning:
Position yourself in a tuck back lever. Extend one leg so it’s straight behind you.
Performing:
Try to hold as long as you can.
Prerequisite for next exercise:
- 3x5s one leg back levers
Straddle Back Lever
The straddle leg back lever is harder than a tuck back lever. You will have your legs spread forming a letter V. This will make a longer lever than one leg variant.
Equipment:
or
How to perform straddle back lever
Positioning:
Do a skin the cat until you are in tuck back lever. Extend both of your legs behind you so that they form a letter V.
Performing:
Hold for time.
Prerequisite for next exercise:
- 3x5s straddle back levers
Back Lever
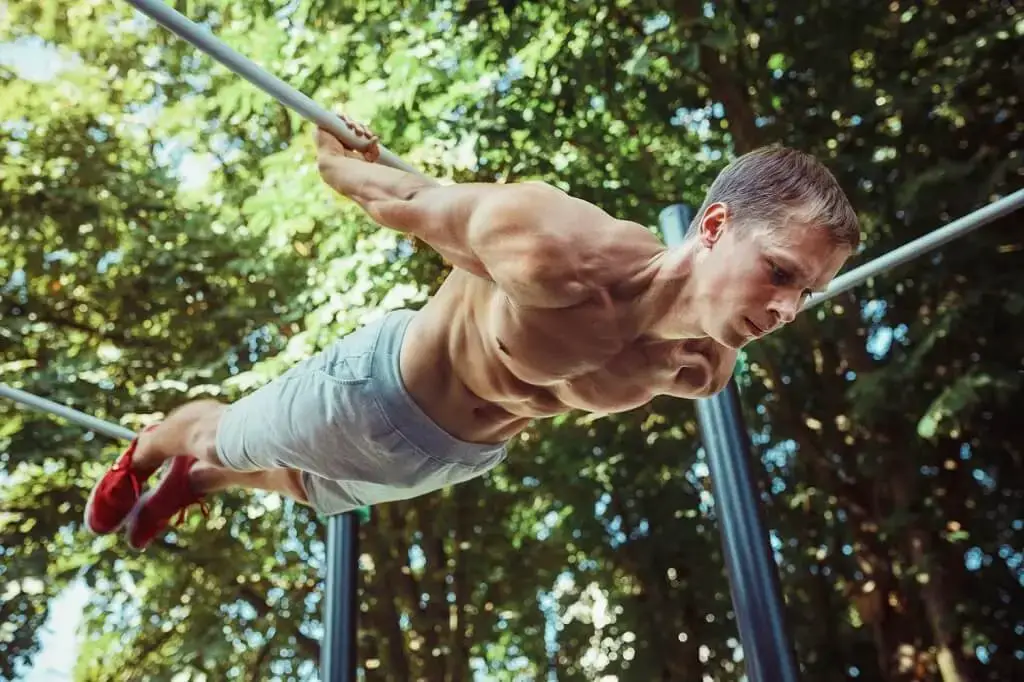
Now it’s time to do a full back lever. This is the hardest skill in back lever progression. You will need a lot of patience and hard, consistent work to get to this point.
Equipment:
or
How to perform back lever
Positioning:
Rotate using the skin the cat. Stop in a tuck back lever position. Extend both legs straight behind you.
Performing:
Hold as long as possible.
Congratulations. You just did your first back lever. This concludes back lever progression.
Conclusion
We’ve reached the end of our journey through the captivating world of back lever progression. Can you believe how far we’ve come?
I hope this adventure has ignited a spark of excitement within you to conquer the back lever and unlock your full potential. The back lever is an awe-inspiring calisthenics skill that showcases not only incredible strength but also exceptional body control.
But progress takes time. It’s not about rushing to the finish line but rather enjoying the process and embracing each milestone along the way. Be patient and persistent and celebrate every small victory, because each one brings you closer to your ultimate goal.
As we wrap up this journey, I want to remind you that you’re capable of achieving incredible things. The back lever may seem intimidating at first, but with consistent effort, determination, and belief in yourself, you’ll be amazed at what you can accomplish.