Front Lever Progression For Powerful Body And Popping Abs
Front lever progression will help you build your core and your arm muscles. Some exercises in this progression will definitely turn heads. Dragon flags and any variation of the front lever will look really impressive.
You will definitely need a lot of strength to perform these impressive skills.
Mastering those exercises will help you with both pushing and pulling exercises as well. Anywhere where you need a strong core and arms, this progression will help you with transferable effects.
You can use this strength to help you in muscle up and one arm push up progression.
Front Lever Progression: Muscles Worked
Front lever progression will require you to build strong abs, biceps, triceps, deltoids, and back muscles. Without benefits from this progression, you will lack the important strength needed for other progressions.
Working on exercises found here proved to be vital for my progress. They helped me move ahead with other progressions when I was stuck.
Front lever progression muscles worked:
Primary
- Abs
- Obliques
- Triceps
- Rear deltoids
Secondary
- Latissimus dorsi
- Rhomboids
- Teres minor
- Pec major and minor
- Forearm muscles
- Quads
- Glutes
Front Lever Progression: Equipment
A great thing when starting front lever progression is that you will not need any equipment. So, you can start doing it anywhere.
Later on, in front lever progression, you will have to move to dip bars and a pull up bar.
Equipment:
- Pull up bar
- Dip bars
- Exercise mat (optional)
Front Lever Progression: Exercises
The easiest exercise in front lever progression is a tuck hollow hold. You will progress through various leg raises and dragon flags all the way up to a full front lever.
When starting out you can easily determine your starting point. In most cases, you will try to find an exercise that you can do in 3 sets for 5-8 reps. This is your starting point. You will then start from the exercise you are able to do and work yourself up the progression.
You can combine this exercise with easier exercises in front lever progression. Those easier exercises will help you increase time under tension.
So, your muscles will be loaded more. This will lead to faster muscle growth. This is what will help you improve faster.
To learn more about how to use progressions to quickly create your own custom workouts check out the Complete calisthenics workout guide.
Front Lever Levels
For your convenience, exercises are divided into six different levels. There are five to six exercises on any given level. When you master all exercises on one level, you can move on to the next.
Level 0 is reserved for lying hip flexor and abs exercises.
You will move gradually to hanging leg raises on Level 1.
Dragon flags are the main theme of Level 2.
Level 3 is reserved for tuck front lever preparation.
One leg front lever is introduced on Level 4.
Level 5 is the most advanced level in a front lever progression where you will work on straddle and full front lever.
Here are the exercises in front lever progression:
Level 0
- tuck hollow hold
- lying knee raise
- lying leg raise
- scissors
- hollow hold arms down
Level 1
- knee windshield wipers
- straight legs windshield wipers
- hollow hold
- hanging knee raises
- hanging knee side raises
- hanging leg raises
Level 2
- dragon flag tuck raises
- dragon flag one leg raises
- dragon flag straddle raises
- dragon flag raises
- toes to bar
- hanging windshield wipers
Level 3
- military pull ups
- tuck vertical hold
- vertical hold
- tuck vertical pulls
- tuck negatives
Level 4
- tuck hold
- tuck pulls
- pull up to vertical
- one leg negatives
- one leg hold
Level 5
- straddle negatives
- straddle hold
- one leg to front lever
- front lever negatives
- front lever
Level 0
Level 0 is concentrated around hip flexor and abs strengthening exercises. Those exercises will help you build strength and prepare you for harder hanging leg raises on the next level.
You can call this the front lever progression preparation phase.
You can use those exercises as regressions once you are able to do harder variants.
Tuck Hollow hold

Tuck hollow holds are the easiest exercise in front lever progression.
You should be able to do this exercise without any prior preparation. Of course, you should always warm up before starting any workout session.
Equipment:
- Exercise mat (optional)
How to perform tuck hollow hold
Positioning:
Lay down on your back. Lift your legs up so that your upper legs form 90 degrees angle to your body and your lower legs are parallel to the floor.
Lift your head and shoulders from the floor. Extend your arms forward around your legs. Your arms should be straight and positioned a little out to your sides.
Hold this position as long as you can. The mastery level for this exercise is 3 sets 60 seconds hold in each set.
Prerequisite for next exercise:
- 3x30s tuck hollow holds
Lying Knee Raise

Lying knee raises are another easy exercise. It will help you prepare for lying leg raises.
Equipment:
- Exercise mat (optional)
How to perform lying knee raise
Positioning:
Lay down on your back. Your arms should be straight and positioned on the floor to your sides with palms facing down.
Upward movement:
To start moving up, lift your heels from the floor. Start bending your knees and moving your legs with bent knees up to your chest. Keep on lifting your legs with bent knees as much as you can.
Downward movement:
To start the downward movement, extend your legs slowly and start moving your knees away from your chest. Keep on straightening your legs until they are completely straight and back on the floor again.
This downward movement should be performed slowly and with control. Don’t let your legs fall down on the floor. They should slowly touch the ground.
You will reach mastery of this exercise when you are able to perform 30 reps in 3 sets.
Prerequisite for next exercise:
- 3×20 lying knee raises
Lying Leg Raise

Lying leg raises are similar to lying knee raises. The only difference is now you will have your legs straight the whole time.
Equipment:
- Exercise mat (optional)
How to perform lying leg raise
Positioning:
Lay flat on the ground. Place your arms on the floor next to you. Your palms should be facing down.
Upward movement:
Raise your legs from the floor by bending at your hips. Keep your legs straight. Keep on raising your legs until they form a 90 degree angle to the floor.
So far, only hip flexors were doing the work. To activate your abs, lift your butt off the floor at the end of the movement.
Downward movement:
To start moving down, first lower your butt to the floor. After that, start lowering your legs. Keep on lowering your legs until they are a few inches above the floor. Don’t let your legs touch the floor.
Concentrate on lowering slowly with control. Don’t let your butt or your legs just drop down on the floor.
To reach mastery, perform 15 reps in 3 sets.
Prerequisite for next exercise:
- 3×10 lying leg raises
Scissors

Scissors are another exercise that will work your hip flexors and abs.
Equipment:
- Exercise mat (optional)
How to perform scissors
Positioning:
Lay down on the floor on your back. Place your straight arms to your sides with palms facing down. Lift your straight legs a few inches from the floor.
Performing:
Cross your legs one over the other keeping them a few inches away from the floor the whole time. Exchange legs.
One rep is when you exchange left over the right and right over the left leg.
Prerequisite for next exercise:
- 3×10 scissors
Hollow Hold Arms Down

Hollow holds with arms down is a harder variant of a tuck hollow hold exercise. In tuck hollow hold your legs were bent. Now your legs will be straight. Everything else will be the same.
Equipment:
- Exercise mat (optional)
How to perform hollow hold arms down
Positioning:
Lay flat on the floor on your back. Extend your arms forward. Your arms should be positioned around your legs. Lift your shoulders and your head off the ground.
Lift your straight legs up a few inches from the floor.
Hold this position as long as you can. You will reach mastery when you are able to do 3 sets with 30 second hold in each set.
Prerequisite for next exercise:
- 3x20s hollow holds arms down
Level 1
This level will move you up to the pull up bar. Here you will work on hanging leg raise variants.
This will prepare you for more challenging exercises that follow. You will predominantly work on dragon flags on the next level. You will need to take your strength up a notch to be able to accomplish this.
Knee Windshield Wipers
Knee windshield wipers are primarily used to work your obliques. So far you have been working mostly on your abs and hip flexors. This exercise will help you develop a well rounded core strength.
Equipment:
- Exercise mat (optional)
How to perform knee windshield wipers
Positioning:
Lay down on the floor face-up. Place your arms with palms down flat on the ground. Lift your legs off the floor and bend them in your knees. Your upper legs should form a 90 degree angle to the floor. Your lower legs should be parallel to the floor.
Performing:
Lower both of your legs to your left side. Keep your legs bent during the movement. Lift your legs up to a starting position.
Lower your legs to your right side. Lift them up again. This counts as one rep.
Mastery for this exercise will be when you are able to do 3 sets with 15 reps in each set.
Prerequisite for next exercise:
- 3×10 knee windshield wipers
Straight Legs Windshield Wipers
Straight legs windshield wipers will add another level of difficulty to your workouts. When you are performing this exercise with straight legs, your obliques will have to endure the entire weight of your legs.
Equipment:
- Exercise mat (optional)
How to perform straight legs windshield wipers
Positioning:
Lay down on the ground. Your arms should be straight. Position your arms wide on the floor to your sides and palms down.
Lift your legs off the floor straight up in the air. Your legs should form a 90 degree angle to the floor.
Performing:
Lower your legs to the left. Raise up your legs to reach the starting position.
Lower your legs to the right. Raise your legs up again. You just did one rep.
When you do 3 sets with 10 reps in each set you have reached mastery of this exercise.
Prerequisite for next exercise:
- 3×6 straight legs windshield wipers
Hollow Hold

The hollow hold is performed with your legs a few inches off the floor. Your arms should be extended up above your head and a few inches off the floor like your legs. This is the hardest variant of a hollow hold exercise.
Equipment:
- Exercise mat (optional)
How to perform hollow hold
Positioning:
Lay down on the ground on your back. Your head and your shoulders should be lifted from the ground. Extend your arms back above your head. Keep your arms straight and lifted a few inches off the floor.
Lift your straight legs up a few inches from the floor.
Try to hold this position as long as you can. To reach mastery do 3 sets with 20 seconds hold in each set.
Prerequisite for next exercise:
- 3x10s hollow holds
Hanging Knee Raises

Now it’s time to move up to a pull up bar. The easiest variant of a hanging leg raise is the hanging knee raise.
Equipment:
- Pull up bar
How to perform hanging knee raises
Positioning:
Grab a pull up bar a bit wider than shoulder width. Your palms should be facing away from you. You will be using the same grip as in pull ups.
You should be hanging freely from a bar with your feet pointed towards the floor and without touching the ground.
Upward movement:
Lift your knees towards your chest. Keep on lifting as much as you can. At the end of the move lift your butt a bit to engage your abs.
Downward movement:
Slowly lower your legs by letting them straighten. Keep on lowering your legs until you are hanging freely from the bar. You should be back in the starting position.
Be careful not to swing during the movement. You should lift and lower your knees slowly and with control.
Prerequisite for next exercise:
- 3×10 hanging knee raises
Hanging Knee Side Raises

Hanging knee side raises is the hanging leg raise variant that will help you work your obliques. You will be lifting your knees to your sides now.
Equipment:
- Pull up bar
How to perform hanging knee side raises
Positioning:
To perform a hanging knee side raise you should hold on to a pull up bar. Your hands would be placed a bit wider than your shoulders with your palms away from you.
Hang from a bar with toes pointed down and without touching the ground.
Upward movement:
Raise your knees up to the left and your right side alternating on each rep. Raise your knees to the side as much as you can without feeling any discomfort or pain.
Downward movement:
Lower down your legs slowly and with control. Keep lowering your legs until they are completely straight and in starting position again.
Try to minimize swinging.
One rep is when you lift and lower your knees on the left and right sides.
Prerequisite for next exercise:
- 3×4 hanging knee side raises
Hanging Leg Raises

Now it’s time for a regular leg raise with your legs straight. This will be more challenging than a knee raise variants. It’s because you will be lifting the entire weight of your legs.
Equipment:
- Pull up bar
How to perform hanging leg raises
Positioning:
Position yourself so that your hands are grabbing pull up bar slightly wider than your shoulders. Use a pronated grip (palms facing away from you).
Point your toes down while you hang from the bar. If you can find a high enough bar, your feet should not touch the ground.
Upward movement:
Raise your legs straight in front of you. Keep on raising your legs until they are parallel to the ground. At the end of the upward movement lift your butt up. This will help you engage your abs.
Downward movement:
Lower down your legs slowly until they are completely straight.
When performing this exercise concentrate on performing it slowly and with minimized swinging.
Prerequisite for next exercise:
- 3×5 hanging leg raises
Level 2
As already mentioned this level is revolving around dragon flag variants. This is an impressive skill by itself.
Every time I’m doing dragon flags it comes with turning heads and impressed looks. This exercise requires a lot of strength. Looking cool while doing it is a nice added bonus.
So, this is a cool front lever progression level.
Dragon Flag Tuck Raises

Dragon flag tuck raise is the easiest dragon flag variant. When you have your knees bent, you are only lifting a portion of your leg weight. To put it more precisely, you are lifting the same weight on a shorter lever. Which in turn makes it easier to do.
Equipment:
- Sturdy object
How to perform dragon flag tuck raises
Positioning:
Lay down flat on your back in front of a sturdy object you can hold on to. Grab this sturdy object with both of your hands. If you can grab it from beneath it would be the best. Bend your legs at your knees.
When you are going to perform dragon flags, you will be lifting the lower portion of your body. Only your shoulder blades should be on the floor. Your entire body from your shoulder blades down should be lifted up in the air.
Upward movement:
Slowly lift your body up in the air. Your entire body from your shoulder blades down should be lifted up in the air. Only your shoulder blades should remain on the floor and you should be holding on to a sturdy object with your hands.
Downward movement:
Slowly lower your body down back to the floor. Don’t let your body drop. It should be a slow controlled motion.
Prerequisite for next exercise:
- 3×5 dragon flag tuck raises
Dragon Flag One Leg Raises

One leg raise is a self explanatory movement. It’s performed with one leg bent in your knee and the other straight. Having one leg straight will increase the difficulty of the exercise.
Equipment:
- The sturdy object you can hold
How to perform dragon flag one leg raises
Positioning:
Lay down on your back. Grab onto something that will hold your weight during the exercise. Bend one of your legs by bending your knee. The other leg should be straight.
Your shoulders and your upper back should remain on the floor during the movement. You will lift your entire body from your shoulders down.
Upward movement:
Raise your body from shoulders down in the air. Keep holding with your hands to counter the lever your body is forming.
Downward movement:
Lower your body down slowly and with control. Don’t let your body fall down rapidly.
Prerequisite for next exercise:
- 3×5 dragon flag one leg raises
Dragon Flag Straddle Raises
Another level of dragon flags is a dragon flag straddle raise. You will be performing a dragon flag with your legs forming a V shape. This will be a bit easier than a full dragon flag and harder than a one leg dragon flag.
Equipment:
- The sturdy object you can grab with your hands
How to perform dragon flag straddle raises
Positioning:
Lay down on the ground. Grab onto something with both of your hands. Your both legs should be straight forming a V shape.
When doing dragon flags, your entire body from your shoulders down will be lifted up in the air. Only your shoulders and a part of your upper back will remain on the floor.
Upward movement:
Raise your legs and your butt off the floor at the same time. Your entire body from shoulders down will be up in the air. Keep lifting until you are almost vertical and feel gravity pull drop significantly.
Downward movement:
Start lowering your legs and your butt back to the ground. Do it in a slow and controlled fashion.
Prerequisite for next exercise:
- 3×5 dragon flag straddle raises
Dragon Flag Raises

After all this preparation, it’s time for a full dragon flag. If you remember the movie Rocky part I don’t remember which – this is the impressive abs exercise Rocky was doing when he was preparing for a boxing match. If that was good for Rocky, it’s good enough for me too.
Equipment:
- Sturdy object to hold onto
How to perform dragon flag raises
Positioning:
Lay on the floor on your back. Place your hands around some firm object and hold it firmly. Your both legs should be straight pointing in front of you.
Upward movement:
Raise your entire body from shoulders down up in the air. Don’t use momentum to lift up. Keep attention to holding your body in a straight line during the movement.
Downward movement:
Lower yourself down slowly. Don’t let your legs fall down rapidly.
Prerequisite for next exercise:
- 3×5 dragon flag raises
Toes To Bar

Toes to a bar are like hanging leg raises exercise on steroids. Once you are able to do toes to bar, you will feel like hanging leg raise is a toe to bar with a limited range of motion.
This exercise will challenge both your strength and flexibility.
Equipment:
- Pull up bar
How to perform toes to bar
Positioning:
To perform toes to bar you should be hanging from a pull up bar. Your hands will be grabbing the bar a little wider than shoulder width and your palms away from you.
Your toes should not touch the ground if you are able to find a high enough pull up bar.
Upward movement:
Lift your legs straight in front of you. Keep on lifting until your legs touch the bar that you are holding.
Downward movement:
Lower your legs down slowly and with control. Try to minimize swinging as much as possible.
Prerequisite for next exercise:
- 3×5 toes to bar
Hanging Windshield Wipers
Hanging windshield wipers is similar to knee side raises. The difference is in the position of your legs. In windshield wipers, your legs will be straight while in knee side raises they are bent in your knees.
This exercise is very demanding to both your strength and flexibility at the same time.
Equipment:
- Pull up bar
How to perform hanging windshield wipers
Positioning:
To do this exercise hang from a bar with your palms looking away from you and with your hands slightly wider than your shoulders. If you have access to a high bar you should be hanging without your toes touching the ground.
When starting out, lift your legs up to your left or your right shoulder (whichever you prefer). You can twist your body even more to the left or right if you can.
Performing:
Move your legs from your left to your right shoulder (or even further to the left and right if you can).
One rep is when you move your legs on the left and right side once.
Prerequisite for next exercise:
- 3×4 hanging windshield wipers
Level 3
Level 3 is reserved for front lever tuck hold preparation. So, we are moving one step closer to our goal.
You can start to feel the front lever is really achievable when you master this level.
Military Pull Ups
Military pull ups are great preparation for rear delts activation. You will need rear delts to hold a lot of weight in each exercise that follows.
Equipment:
- Pull up bar
How to perform military pull ups
Positioning:
You should be hanging from a pull up bar using the same grip as in a neutral grip pull up.
Upward movement:
To start this movement let your body swing a bit forward. This movement should feel a lot like an initiation of a muscle up.
Pull your body backward by activating your rear deltoids and your lats. Your body and your arms should be straight during the movement and you should only let your shoulders move backward. Let your legs swing a little bit forward. Keep your entire body tight.
Downward movement:
Let your body return to starting position while trying to fight the swing momentum. Try to stop your body completely from swinging when you are returning back to a starting position.
Prerequisite for next exercise:
- 3×5 military pull ups
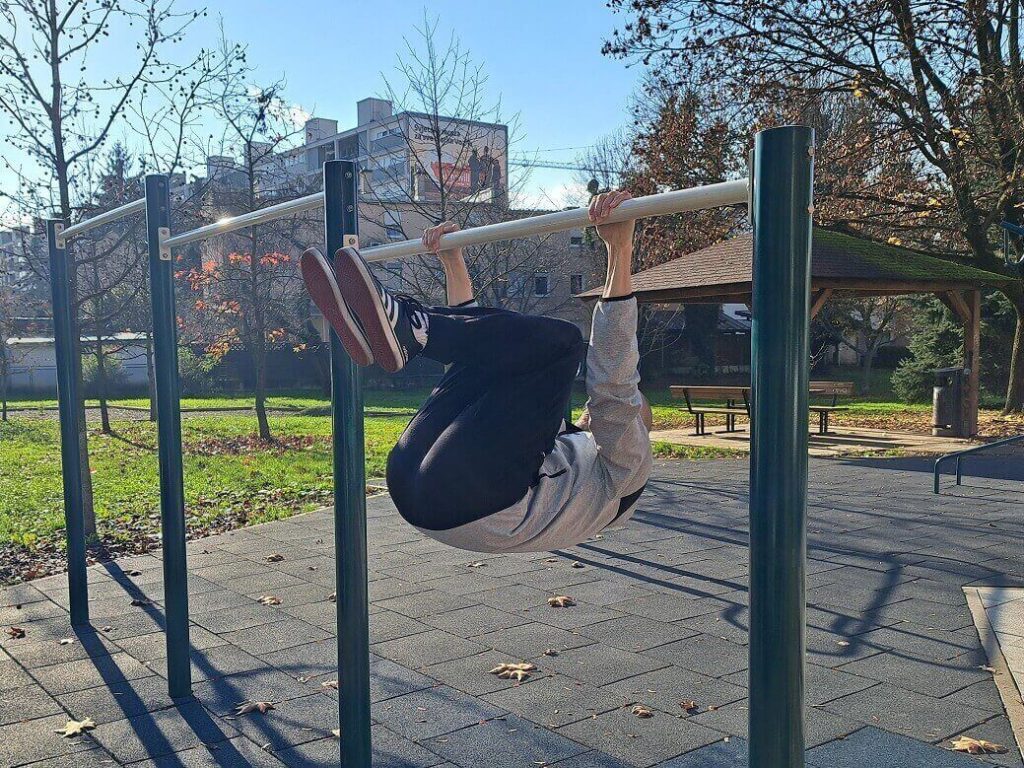
Tuck Vertical Hold
You can perform tuck vertical holds on a pull up bar or dip bars. It will be easier to do it on dip bars because you can swing up freely without worrying that you will hit a bar with your legs.
Equipment:
- Pull up bar
or
- Dip bars
How to perform tuck vertical hold
Positioning:
Jump from the floor with your legs while holding on to a pull up bar or dip bars. You should swing your body hard with your knees tucked. It will be easier to position if you can move your knees up to your chest fast. The faster you pull your knees to your chest the less force you will need to provide with your legs.
The aim is to get upside down with your knees to your chest while holding on to the bar. Your arms should be straight.
Try holding this position as long as possible.
Prerequisite for next exercise:
- 3x10s tuck vertical holds
Vertical Hold

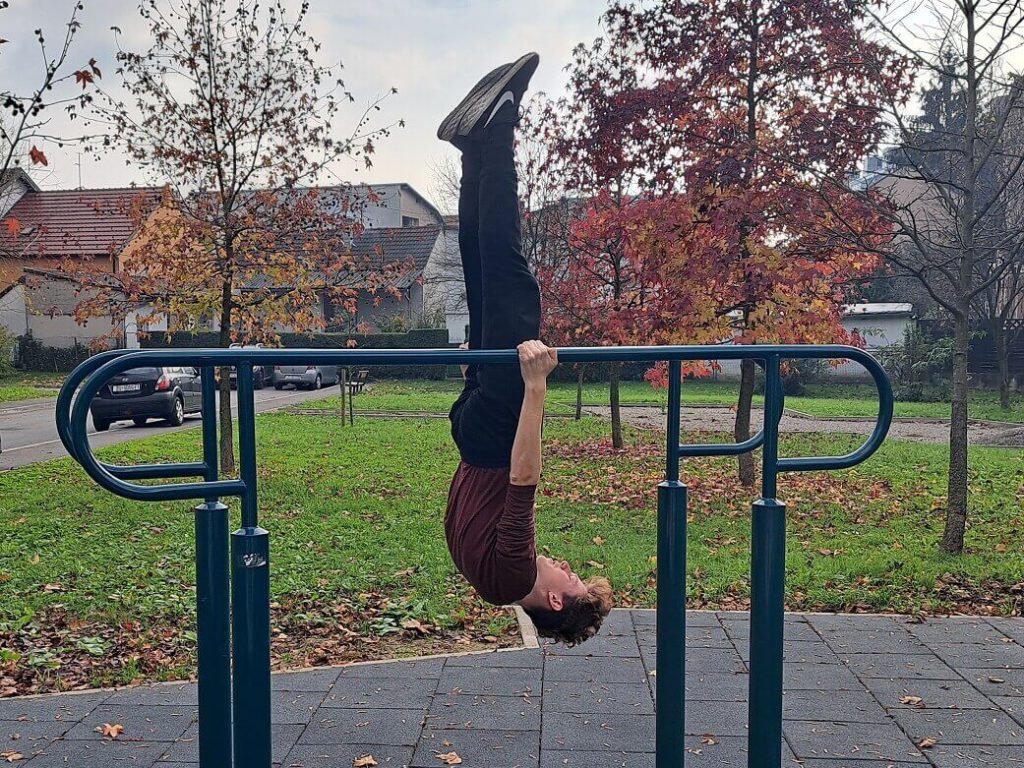
The vertical hold is a bit harder than the tuck vertical hold. It will not require a lot of strength if you do it on dip bars. But you will have to be able to balance a bit better than in tuck vertical hold.
This exercise will be much easier to perform on dip bars. Pull up bar will prevent you from swinging with your knees bent. This will make it much harder to position yourself.
I can do it on dip bars, but a straight bar is still giving me a hard time. The limitation for me is not being able to do toes to bar.
Equipment:
- Pull up bar
or
- Dip bars
How to perform vertical hold
Positioning on dip bars:
Position yourself in a tuck vertical position explained above.
When you reach a tuck vertical position, just extend your legs straight up in the air.
Hold this position for as long as you can.
Positioning on a pull up bar:
To position on a pull up bar, you can’t swing with your knees to your chest. This makes positioning on a pull up bar a lot harder than on dip bars.
To position yourself in a vertical hold on a pull up bar you will need to perform a toes to bar. After you do toes to bar you should pull your lower back up. This movement should feel like a deadlift.
You are now in a vertical hold position.
Hold this position for as long as you can.
Prerequisite for next exercise:
- 3x10s vertical holds
Tuck Vertical Pulls
Tuck vertical pulls will help you strengthen your arms while hanging upside down. This exercise should be performed on dip bars.
Equipment:
- Dip bars
How to perform vertical pulls
Positioning:
Position yourself like in a tuck vertical hold.
Upward movement:
Lift your entire body up by bending your arms at your elbows. Lift up as much as you can. It can be challenging to keep your body from swinging. Do as best as you can to keep your body as steady as possible.
Downward movement:
Lower yourself back down to tuck vertical hold by extending your arms in your elbows.
Prerequisite for next exercise:
- 3×5 tuck vertical pulls
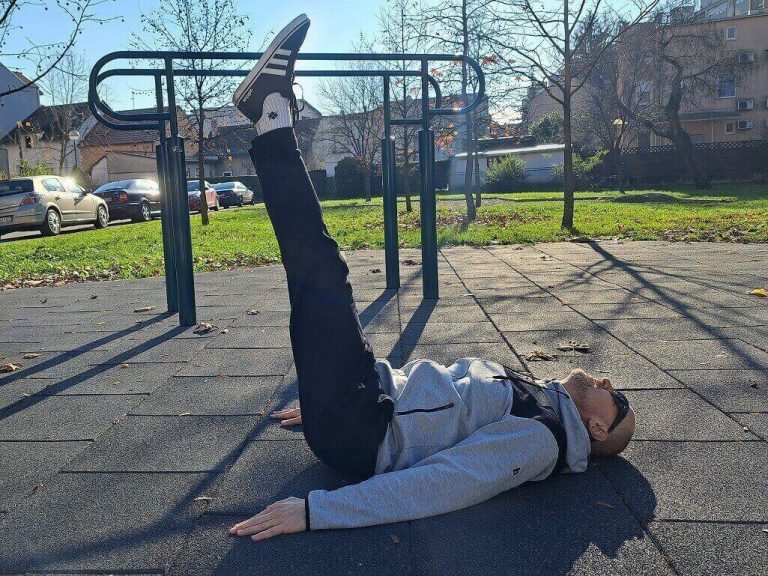
Tuck Negatives
Tuck negatives should be performed on a pull up bar. It’s a lowering motion from a tuck front lever to a free hanging position. When you are just starting out, you should start your descent from a tuck vertical hold. When you build up your strength, you will be able to do a tuck negative from a tuck front lever.
Equipment:
- Pull up bar
How to perform tuck negatives
Positioning:
Initiate your upward positioning movement the same way as in tuck vertical hold. Now you will have to use less force.
The aim is to get your body parallel to the floor with your knees to your chest while holding on to the bar with straight arms. You are now in a tuck front lever position.
Downward movement:
Lower yourself down by letting your legs slowly drop down. Let your legs go down until your legs touch the ground. You should control this descent. Don’t let your legs drop down fast.
Prerequisite for next exercise:
- 3x5s tuck negatives
Level 4
On this level, you will progress from a tuck front lever to a one leg front lever. At this point, I’m able to do tuck front lever. One leg front lever is still out of reach for me.
This is front level progression level for masters.
Tuck Hold

Tuck hold is the easiest front lever variant. I needed quite a lot of time to get to the level of strength needed to do this exercise.
Equipment:
- Pull up bar
How to perform a tuck hold
Positioning:
Position yourself as you did for tuck negatives.
Hold as long as you can.
Prerequisite for next exercise:
- 3x5s tuck holds
Tuck Pulls
Tuck pulls will help you build the strength of your arms while also holding your body parallel to the ground. This will add another level of difficulty to already hard exercise.
Equipment:
- Pull ups bar
How to perform tuck pulls
Positioning:
Position yourself in a tuck front lever position.
Upward movement:
Lift your entire body up by bending your arms at your elbows. Lift up as much as you can. It can be challenging to keep your body from swinging. Do as best as you can to keep your body as steady as possible.
Downward movement:
Lower yourself back down to tuck front lever position by extending your arms at your elbows.
Prerequisite for next exercise:
- 3×5 tuck pulls
Pull Up To Vertical
Pull up to vertical will make you move your body from a pull up to a vertical hold position. This exercise will be hard on your core, your back, and your arms.
Equipment:
- Pull up bar
How to perform pull up to vertical
Positioning:
Grab a pull up bar a bit wider than shoulder width and your palms facing away from you. Pull your body up by bending your elbows. Keep on pulling until your chin is over the bar (full pull up).
Forward movement:
Lift your legs under the bar on the other side and keep lifting your legs up. Your legs should come up in the air on the other side of the bar. At the same time lower your arms down. At the end of the forward movement your legs should be straight in the air and your arms straight. You are in a vertical hold position.
Backward movement:
To start moving back let your legs fall down to the floor. At the same time pull your arms hard so your chest comes back to the bar. Don’t let your legs fall down completely without control. You should be slowing your legs down using your core. So, there will be minimal swinging back under the bar.
Prerequisite for next exercise:
- 3×3 pull ups to vertical
One Leg Negatives
One leg negatives are similar to tuck negatives. Only this time, you will have one leg extended and the other bent in your knee.
Equipment:
- Pull up bar
How to perform one leg negatives
Positioning:
Position yourself in a tuck front lever position. Extend one of your legs so it’s straight.
Downward movement:
Lower yourself down by letting your legs slowly drop down. Let your legs go down until your extended leg touches the ground. You should control this descent. Don’t let your legs drop down fast.
Prerequisite for next exercise:
- 3x5s one leg negatives
One Leg Hold
One leg hold is similar to a tuck hold. The difference is in one leg that is now straight.
Equipment:
- Pull up bar
How to perform a one leg hold
Positioning:
Position yourself in a tuck front lever. Extend one leg straight.
Hold as long as possible.
Prerequisite for next exercise:
- 3x5s one leg holds
Level 5
This is the final and the most difficult level in front lever progression. You will be doing straddle and full front lever on this level.
It will require a lot of strength.
Straddle Negatives
Straddle negatives are very similar to full front lever negatives. The only difference is the straddle. In this move, you will have your legs form a V shape.
Equipment:
- Pull up bar
How to perform straddle negatives
Positioning:
Position yourself in a vertical hold position and spread your legs so they form a V shape. Lower your legs and your body so they are parallel to the floor. You are now in a straddle hold position.
Downward movement:
Lower yourself down by letting your legs slowly drop down. Let your legs go down until you are hanging freely from the bar. You should control this descent. Don’t let your legs drop down fast.
Prerequisite for next exercise:
- 3x5s straddle negatives
Straddle Hold
After you were able to do a straddle negative you should be able to go for a straddle hold as well.
Equipment:
- Pull up bar
How to perform straddle hold
Positioning:
Position yourself in a straddle hold position like explained above.
Try holding as long as you can.
Prerequisite for next exercise:
- 3x5s straddle holds
One Leg To Front Lever
It’s time to gradually introduce the front lever. The easiest way is by starting in a one leg hold position and extending your bent leg.
Equipment:
- Pull up bar
How to perform one leg to front lever
Positioning:
Position yourself in a vertical hold position. Bend one leg in the knee. Lower your legs and your body so they are parallel to the floor. You are now in a one leg hold position.
Performing:
Extend your bent leg so both your legs are completely straight. Bend your other leg. Repeat for reps. One rep is extending your left leg and bending, then your right leg and bending back.
Prerequisite for next exercise:
- 3×2 one leg to front lever
Front Lever Negatives
After doing one leg to front lever, front lever negatives will be easy for you. You probably already know how to perform this exercise just by its name. This exercise is just one step before mastering the complete front lever progression.
Equipment:
- Pull up bar
How to perform front lever negatives
Positioning:
Position yourself in a vertical hold position. Lower your legs and your body so they are parallel to the floor. You are now in a front lever hold position.
Downward movement:
Lower yourself down by letting your legs slowly drop down. Let your legs go down until you are hanging freely from the bar. You should control this descent. Don’t let your legs drop down fast.
Prerequisite for next exercise:
- 3x3s front lever negatives
Front Lever

Now it’s time for your first full front lever. This is the hardest exercise in a front lever progression. After performing one leg to front lever and front lever negatives, you should be able to do a front lever hold for a few seconds.
Equipment:
- Pull up bar
How to perform front lever
Positioning:
Position yourself in a vertical hold position. Lower your legs and your body so they are parallel to the floor. You are now in a front lever hold position.
Hold this position as long as you can.
This exercise concludes front lever progression.