Uncover The Ultimate Squat Progression For Insane Leg Gains!
Hey there, fitness enthusiast! Are you ready to take your leg gains to a whole new level? Well, get ready because today we’re diving deep into the world of squat progression.
This is the secret sauce you’ve been missing in your leg training routine. We’re going to uncover the key skills that will help you achieve insane leg gains like never before!
Now, you might be wondering, “What exactly is squat progression?”
Well, it’s all about gradually challenging yourself and pushing beyond your limits in your squat exercises. By consistently and strategically increasing the intensity, you can unlock new levels of strength, power, and muscle growth in your legs.
Level Of Difficulty
Squat progression is excellent progression targeting your leg muscles. Here’s who will benefit the most from it:
- People recovering from injury*
- Beginners*
*This progression is ideal for people who are just starting out or recovering from injury. To be on the safe side show the exercises to your doctor and ask him if it’s safe for you to start this progression.
Squat Progression: Muscles Worked
Here’s what muscles will be working in a squat progression:
Primary:
- Quads
- Glutes
- Hamstrings
- Calves
Secondary:
- Abs
- Obliques
- Lower back
- Hip flexors
Equipment
You can actually go without any equipment to go through this progression. What you need you can find just about anywhere you are. If you have a wall to lean on and a desk or chair you can hold onto, you are all set.
For convenience, you may consider using an exercise mat. But this is completely optional and you can definitely go without it if you don’t have it.
Equipment:
- Exercise mat (optional)
- Wall (or anything else you can lean on)
- Something to hold on to (dip bars, low bar, table, chair)
Exercises
If you are recovering from injury or you extremely neglected your body, you may want to start with the easiest exercises in this progression.
Glute bridges are as easy as they can get. I was doing them as a part of my rehab routine when I was recovering from a knee injury.
Squat Levels
To make it easier to follow your progress, exercises are divided into two levels.
Level 1 is a level that is used to prepare your muscles for the load needed to perform your first squat.
On Level 2 you are actually working on doing your first squat and slightly beyond a regular squat.
Level 1
- Glute bridges
- Glute bridge hold
- Half wall sit
- Wall sit
Level 2
- Assisted half squats
- Half squats
- Assisted squats
- Squats
- Deep squats
- Squat jumps
Squat Progression: Level 1
Level 1 is great for starting your squat journey. This level will prepare your muscles for harder exercises.
This is the squat progression preparation phase. The phase in which your body will have to adapt to the basic strength level. This is the level that will prepare you for harder exercises before you can do your first squat.
Glute Bridges
Glute bridges are a nice starting exercise in your squat progression.
This exercise will help you develop some basic strength in your glutes, quads, and your core. Those muscles will have to work more and more when you progress.
Like the other basic exercises in other progressions, this exercise can be later used in your warm-up sessions.
Equipment:
- Exercise mat (optional)
How to perform glute bridges
Positioning:
Lay down on your back with arms to your sides and palms down. Bend your knees. Place your feet flat on the ground a few inches away from your butt.
Upward movement:
To start moving up, press your feet against the floor. Lift your butt off the ground. Keep on lifting until your body is in a straight line from the neck to your knees. Hold for a second.
Downward movement:
To go back down to a starting position, let your butt sink down. Keep on lowering your butt until you are flat on your back again.
This should be a slow controlled motion. Don’t let your butt fall down to the ground.
To reach mastery of this exercise do 3 sets with 30 reps in each set.
Prerequisite for next exercise:
- 3×10 glute bridges
Glute Bridge Hold
Glute bridge holds are an isometric version of a glute bridge. In glute bridges, you are doing exercise for reps, in glute bridge hold you are holding the position for a specified time.
Equipment:
- Exercise mat (optional)
How to perform glute bridge holds
Positioning:
Lay on the floor on your back. Place your arms beside you. Move your feet closer to your butt. Your feet need to be positioned with your soles on the floor.
Lift your butt off the ground and hold when your body is in a straight line from your neck to your knees.
Hold for as long as you can.
To reach mastery of this exercise hold for 30 seconds or longer for 3 sets.
Prerequisite for next exercise:
- 3x20s glute bridge holds
Half Wall Sit
Half wall sit is another isometric exercise to prepare your leg muscles for more difficult exercises and increased load.
This will be harder than previous exercises because the gravitational pull will be stronger. When compared to exercises where you were laying on the floor, standing exercises will load your muscles more.
Equipment:
- Wall (or something else you can lean on)
How to perform half wall sit
Positioning:
Lean your entire back against the wall. Place your feet on the ground a bit wider than your hip width. Your legs are bent in your knees.
Your thighs form an obtuse angle to your calves. Meaning, your upper and lower legs form an angle wider than 90 degrees.
This will make it easier to hold this position compared to a wall sit where your legs will be positioned at exactly 90 degrees.
Hold for as long as you can.
The mastery level of this exercise is holding 3 sets for 30 seconds in each set.
Prerequisite for next exercise:
- 3x10s half wall sits
Wall Sit
Wall sit will be a little more challenging than a half wall sit. It’s basically the same exercise. The only difference is that in this exercise your upper and lower legs will be positioned at exactly 90 degrees angle.
Equipment:
- Wall (or another vertical object)
How to perform wall sit
Positioning:
Stand in front of a wall or some other sturdy vertical object with your back toward the wall. You should lean with your back against the wall. Your legs should form a 90 degree angle (upper to lower legs).
Hold this position as long as possible.
To reach mastery aim for holding this position 3 sets for 30 seconds in each set.
Prerequisite for next exercise:
- 3x10s wall sits
Squat Progression: Level 2
Now that you have mastered the preparation level, it’s time to work on your first squat. There are several exercises on this level that will help you master your first full squat.
This squat progression level is crucial in your further development. Similar to a level where you were finally able to perform your first pull up in a muscle up progression.
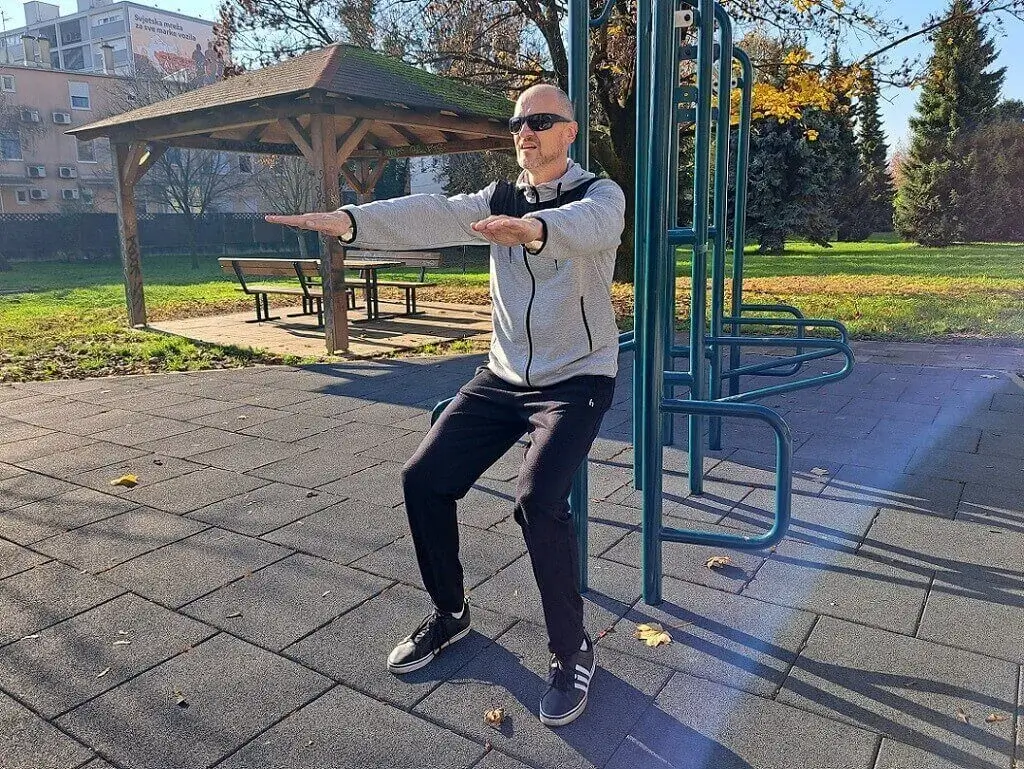
Assisted Half Squats
Assisted half squats are similar to half squats. The only difference is that you will be holding on to something in assisted half squats.
In half squats, you will be performing exercise without holding on to anything. This will make half squats a little harder to do.
Equipment:
- Something to hold on to (dip bars, low bar, table, chair)
How to perform assisted half squats
Positioning:
Stand in front of something sturdy you can grab and hold on to. For example, this could be a low bar.
Grab a low bar with your hands. Your feet should be positioned a bit wider than your hips.
Downward movement:
To lower yourself down, lower your butt down by flexing your legs in your knees. Keep on lowering down as far as you can.
At this stage, you will not go so low that your upper and lower legs form 90 degrees angle.
Upward movement:
To initiate upward movement start extending your legs at your knees. Keep on extending your legs until you are standing straight again.
You will reach mastery of this exercise when you are able to do 3 sets of 20 reps.
Prerequisite for next exercise:
- 3×10 assisted half squats
Half Squats
Half squats will help you progress even further. Your muscles will get stronger and prepare you for even more difficult exercises.
Equipment:
- None
How to perform half squats
Positioning:
Stand with your feet a little wider than hip-width. Your arms are falling freely to your sides.
Downward movement:
Lower your butt by bending your legs at your knees. At this point, you will not go so low that your legs form a 90-degree angle.
At the same time bend and raise your arms in front of you to help with stability during the exercise.
Upward movement:
To move back up, start extending your legs. Keep on extending your legs until you are back in the starting position.
At the same time lower your arms back to your sides.
To reach mastery do 3 sets of 20 reps.
Prerequisite for next exercise:
- 3×10 half squats
Assisted Squats
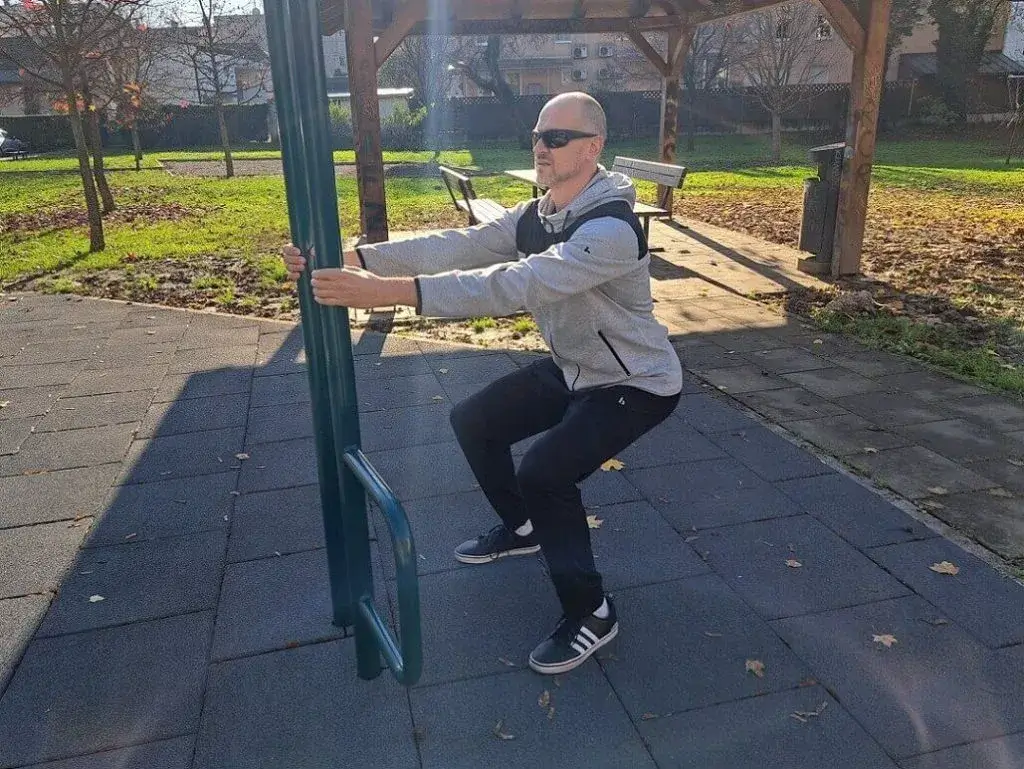
Assisted squats are almost the same as assisted half squats. The only difference is in the range of motion. In Assisted squats, you will sink deeper with your butt. In the lowest position, your upper and lower legs will form a 90 degrees angle.
Equipment:
- Something to hold on to (dip bars, low bar, table, chair)
How to perform assisted squats
Positioning:
Stand with your feet a bit wider than hip-width. Grab onto some object that will help you keep balance during the exercise.
Downward movement:
Lower down your butt by bending your knees. Keep on bending your knees until your legs form a 90-degree angle.
Upward movement:
Extend your legs in your knee until you are standing straight.
For mastery do 3 sets of 20 reps.
Prerequisite for next exercise:
- 3×10 assisted squats
Squats
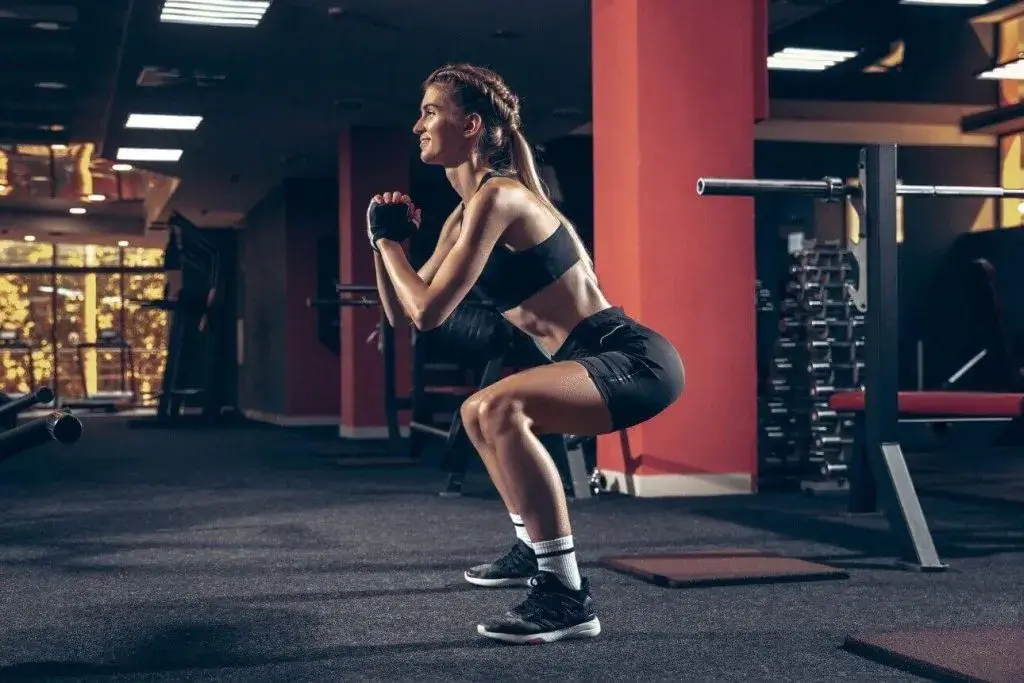
Performing your first squat is a great milestone to achieve in your squat progression. When you are able to do this exercise with precision and ease, you will be progressing even further in no time.
Equipment:
- None
How to perform squats
Positioning:
Your feet should be a bit wider than your hips and your arms falling freely to your sides.
Downward movement:
Lower your butt down by bending your legs at your knees. Come down until your legs form a 90 degrees angle.
At the same time bend and raise your arms in front of you to help with stability during the exercise.
Upward movement:
To start moving up extend your legs until you are standing in a starting position again.
At the same time lower your arms back to your sides.
Mastery will be reached when you are able to do 3 sets of 20 reps.
Prerequisite for next exercise:
- 3×10 squats
Deep Squats
Deep squats are all about an increased range of motion compared to a regular squat. When you first start with deep squats you may only be able to go just a fraction below 90 degrees.
As your muscles adapt and your flexibility increases, you will be able to go deeper and deeper. This exercise might not be the healthiest one for your knees.
If you don’t feel at ease performing this version of the exercise, you can skip it. If at any point you feel discomfort or pain, stop immediately. You would want to improve your health and not hinder it.
Equipment:
- None
How to perform deep squats
Positioning:
Stand firmly on both of your legs wider than your hip width. Let your arms fall freely to your sides.
Downward movement:
Start your descent by lowering your butt. Lower your butt down by bending your legs at your knees. Your weight should be on your heels. Keep on lowering down as far as possible. While lowering down raise your arms in front of you to counter your weight behind the center of mass.
Upward movement:
To go up again start straightening your legs and move your butt up. Lift up until you are back in the starting position. Lower your arms down while rising your butt up.
Mastery for this exercise is when you are able to do 3 sets of 15 reps.
Prerequisite for next exercise:
- 3×10 deep squats
Squat Jumps
Squat jumps are the first explosive exercise in the squat progression. Its main function is to introduce a different kind of stimulus for your muscles.
It’s another way to shock your muscles to stimulate muscle strength development. It’s performed like a normal squat with a boost. On each rep, you will do a squat with a jump that will lift you up in the air.
Equipment:
- None
How to perform squat jumps
Positioning:
Stand on the ground with your feet slightly wider than your hips and your arms falling to your sides.
Downward movement:
Lower your butt down by bending your knees. Keep on lowering down until your legs form a 90 degree angle. While lowering down raise and bend your arms in front of you.
Upward movement:
Explosively push yourself with your legs against the ground. In one swift movement extend your legs and your arms so you are completely lifted from the ground.
When you are able to do 3 sets of 15 reps you have reached mastery.
Conclusion
Jump squats are the exercise that concludes this squat progression. That’s about it for squats using both legs. When you master jump squats you are ready to tackle even harder exercises.
There is a whole new world of leg exercises you can do on one leg. A whole advanced progression dedicated to one-leg skills waiting for you to master. When you are ready, jump onto the pistol squat progression and discover advanced exercises that will ensure your leg growth and strength development.