Leg Raise Progression: The Ultimate Shortcut To Rock-Solid Core!
Are you ready to embark on a journey toward a rock-solid core? Well, you’re in luck because today we’re diving headfirst into the world of leg raise progression. Trust me, once you master these core strength basics, you’ll be feeling like an absolute boss!
Think of leg raise progression as a stairway to an impressive core. It’s designed to challenge your abdominal muscles and build strength, one step at a time. If you are just starting out or have some previous fitness experience, this progression offers a fantastic way to take your core training to a whole new level.
Get ready to unleash your inner warrior and discover the incredible power of leg raise progression. Let’s do this!
Level Of Difficulty
Leg raise progression is the most suited for:
- Beginners*
*This progression is ideal for people who are just starting out. But, all physical activity comes with a risk of injury. Before starting any type of physical activity consult your doctor.
Leg Raise Progression: Equipment
Leg raise progression is done laying on the floor. You can do this entire progression without any equipment. But, if you like to be laying on a softer surface, you may want to use an exercise mat. But this is completely optional.
Equipment:
- Exercise mat (optional)
Leg Raise Progression: Exercises
Leg raise progression is primarily targeting your ab muscles. There are 8 exercises in this progression. All are done laying on the ground.
This progression is beginner friendly. It starts with a tuck hollow hold and ends with a hollow hold.
When you master hollow hold you are ready to move your core workout up to a pull up bar. The next stop is the toes to bar progression that will literally raise the bar of your ab development.
Tuck Hollow hold
Tuck hollow holds are the easiest exercise in the leg raise progression.
You should be able to do this exercise without any prior preparation. Of course, you should always warm up before starting any workout session.
Equipment:
- Exercise mat (optional)
How to perform tuck hollow hold
Positioning:
Lay down on your back. Lift your legs up so that your upper legs form 90 degrees angle to your body and your lower legs are parallel to the floor.
Lift your head and shoulders from the floor. Extend your arms forward around your legs. Your arms should be straight and positioned a little out to your sides.
Hold this position as long as you can. The mastery level for this exercise is 3 sets 60 seconds hold in each set.
Prerequisite for next exercise:
- 3x30s tuck hollow holds
Lying Knee Raise
Lying knee raises are another easy exercise. It will help you prepare for lying leg raises.
Equipment:
- Exercise mat (optional)
How to perform lying knee raise
Positioning:
Lay down on your back. Your arms should be straight and positioned on the floor to your sides with palms facing down.
Upward movement:
To start moving up, lift your heels from the floor. Start bending your knees and moving your legs with bent knees up to your chest. Keep on lifting your legs with bent knees as much as you can.
Downward movement:
To start the downward movement, extend your legs slowly and start moving your knees away from your chest. Keep on straightening your legs until they are completely straight and back on the floor again.
This downward movement should be performed slowly and with control. Don’t let your legs fall down on the floor. They should slowly touch the ground.
You will reach mastery of this exercise when you are able to perform 30 reps in 3 sets.
Prerequisite for next exercise:
- 3×20 lying knee raises
Lying Leg Raise
Lying leg raises are similar to lying knee raises. The only difference is now you will have your legs straight the whole time.
Equipment:
- Exercise mat (optional)
How to perform lying leg raise
Positioning:
Lay flat on the ground. Place your arms on the floor next to you. Your palms should be facing down.
Upward movement:
Raise your legs from the floor by bending at your hips. Keep your legs straight. Keep on raising your legs until they form a 90 degree angle to the floor.
So far, only hip flexors were doing the work. To activate your abs, lift your butt off the floor at the end of the movement.
Downward movement:
To start moving down, lower your butt to the floor. After that, start lowering your legs. Keep on lowering your legs until they are a few inches above the floor. Don’t let your legs touch the floor.
Concentrate on lowering slowly with control. Don’t let your butt or your legs just drop down on the floor.
To reach mastery, perform 15 reps in 3 sets.
Prerequisite for next exercise:
- 3×10 lying leg raises
Scissors
Scissors are another exercise that will work your hip flexors and abs.
Equipment:
- Exercise mat (optional)
How to perform scissors
Positioning:
Lay down on the floor on your back. Place your straight arms to your sides with palms facing down. Lift your straight legs a few inches from the floor.
Performing:
Cross your legs one over the other keeping them a few inches away from the floor the whole time. Exchange legs.
One rep is when you exchange left over the right and right over the left leg.
Prerequisite for next exercise:
- 3×10 scissors
Hollow Hold Arms Down
Hollow holds with arms down is a harder variant of a tuck hollow hold exercise. In tuck hollow hold your legs were bent. Now your legs will be straight. Everything else will be the same.
Equipment:
- Exercise mat (optional)
How to perform hollow hold arms down
Positioning:
Lay flat on the floor on your back. Extend your arms forward. Your arms should be positioned around your legs. Lift your shoulders and your head off the ground.
Lift your straight legs up a few inches from the floor.
Hold this position as long as you can. You will reach mastery when you are able to do 3 sets with 30 second hold in each set.
Prerequisite for next exercise:
- 3x20s hollow holds arms down
Knee Windshield Wipers
Knee windshield wipers are primarily used to work your obliques. So far you have been working mostly on your abs and hip flexors. This exercise will help you develop a well rounded core strength.
Equipment:
- Exercise mat (optional)
How to perform knee windshield wipers
Positioning:
Lay down on the floor face-up. Place your arms with palms down flat on the ground. Lift your legs off the floor and bend them at your knees. Your upper legs should form a 90 degree angle to the floor. Your lower legs should be parallel to the floor.
Performing:
Lower both of your legs to your left side. Keep your legs bent during the movement. Lift your legs up to a starting position.
Lower your legs to your right side. Lift them up again. This counts as one rep.
Mastery for this exercise will be when you are able to do 3 sets with 15 reps in each set.
Prerequisite for next exercise:
- 3×10 knee windshield wipers
Straight Legs Windshield Wipers
Straight legs windshield wipers will add another level of difficulty to your workouts. When you are performing this exercise with straight legs, your obliques will have to endure the entire weight of your legs.
Equipment:
- Exercise mat (optional)
How to perform straight legs windshield wipers
Positioning:
Lay down on the ground. Your arms should be straight. Position your arms wide on the floor to your sides and palms down.
Lift your legs off the floor straight up in the air. Your legs should form a 90 degree angle to the floor.
Performing:
Lower your legs to the left. Raise up your legs to reach the starting position.
Lower your legs to the right. Raise your legs up again. You just did one rep.
When you do 3 sets with 10 reps in each set you have reached mastery of this exercise.
Prerequisite for next exercise:
- 3×6 straight legs windshield wipers
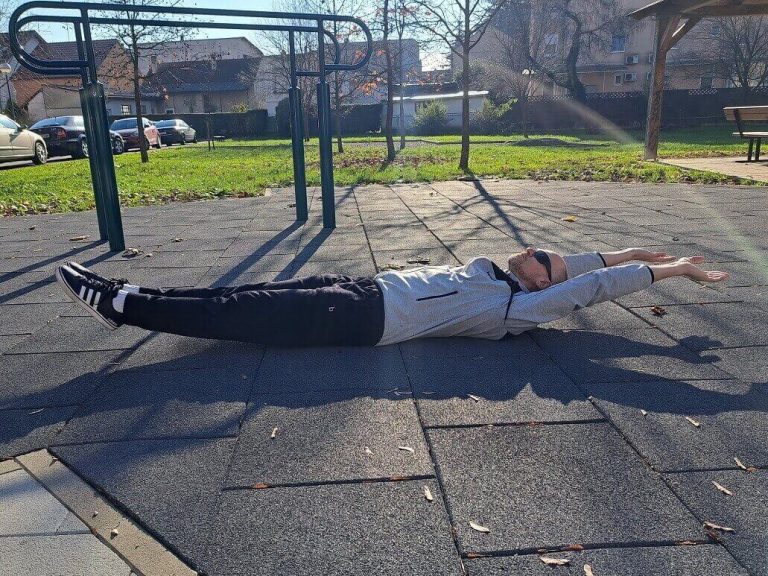
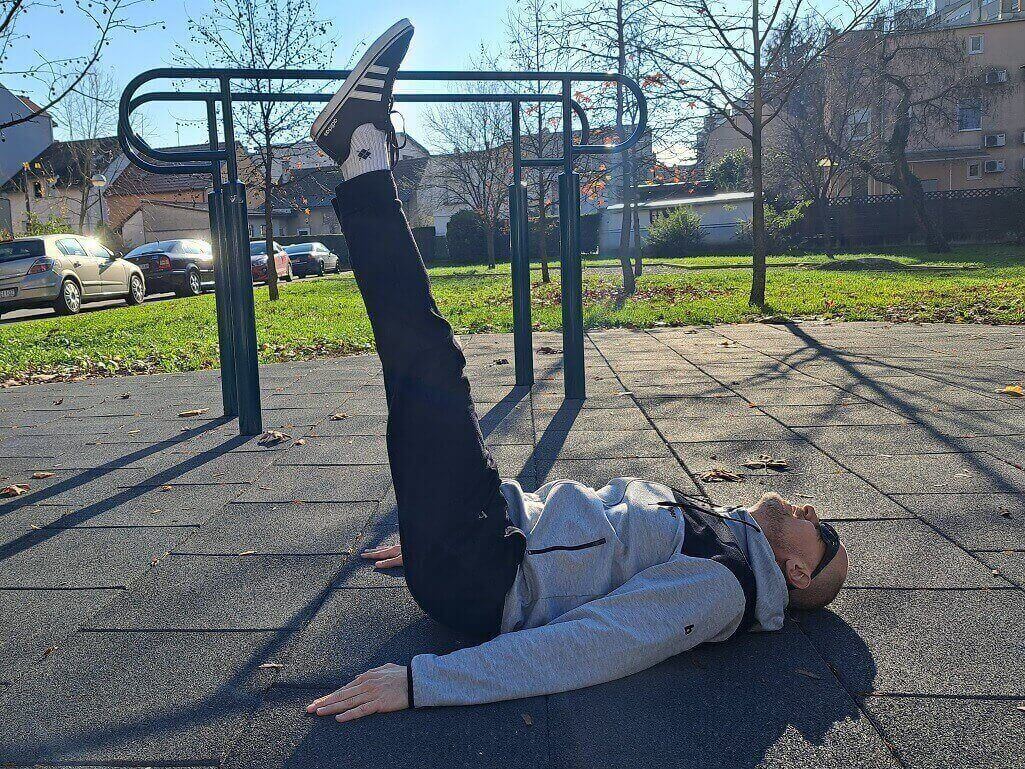
Hollow Hold
The hollow hold is performed with your legs a few inches off the floor. Your arms should be extended up above your head and a few inches off the floor like your legs. This is the hardest variant of a hollow hold exercise.
Equipment:
- Exercise mat (optional)
How to perform hollow hold
Positioning:
Lay down on the ground on your back. Your head and your shoulders should be lifted from the ground. Extend your arms back above your head. Keep your arms straight and lifted a few inches off the floor.
Lift your straight legs up a few inches from the floor.
Try to hold this position as long as you can. To reach mastery do 3 sets with 20 seconds hold in each set.
Conclusion
We’ve reached the end of our journey through the leg raise progression. You’ve learned how to master core strength basics, and I hope you’re feeling inspired and motivated to give it a try.
I encourage you to keep pushing yourself, challenging your limits, and embracing the journey of mastering leg raise progression. With time and dedication, you’ll witness your core strength soar to new heights.
Now, go out there and show the world what you’re made of. I got your back.